Crew Changes
The Crew Changes feature makes getting your seafarers on- and offboard less stressful.
Please note, manning agents are not able to add or edit a crew change although you can download a change's relevant documents. This feature is for your information only and you can only see crew changes that relate to your company.
Introduction to Crew Changes
Log in to your Martide account. In the menu on the left you will see Crew Changes. Click on it and you will see this:
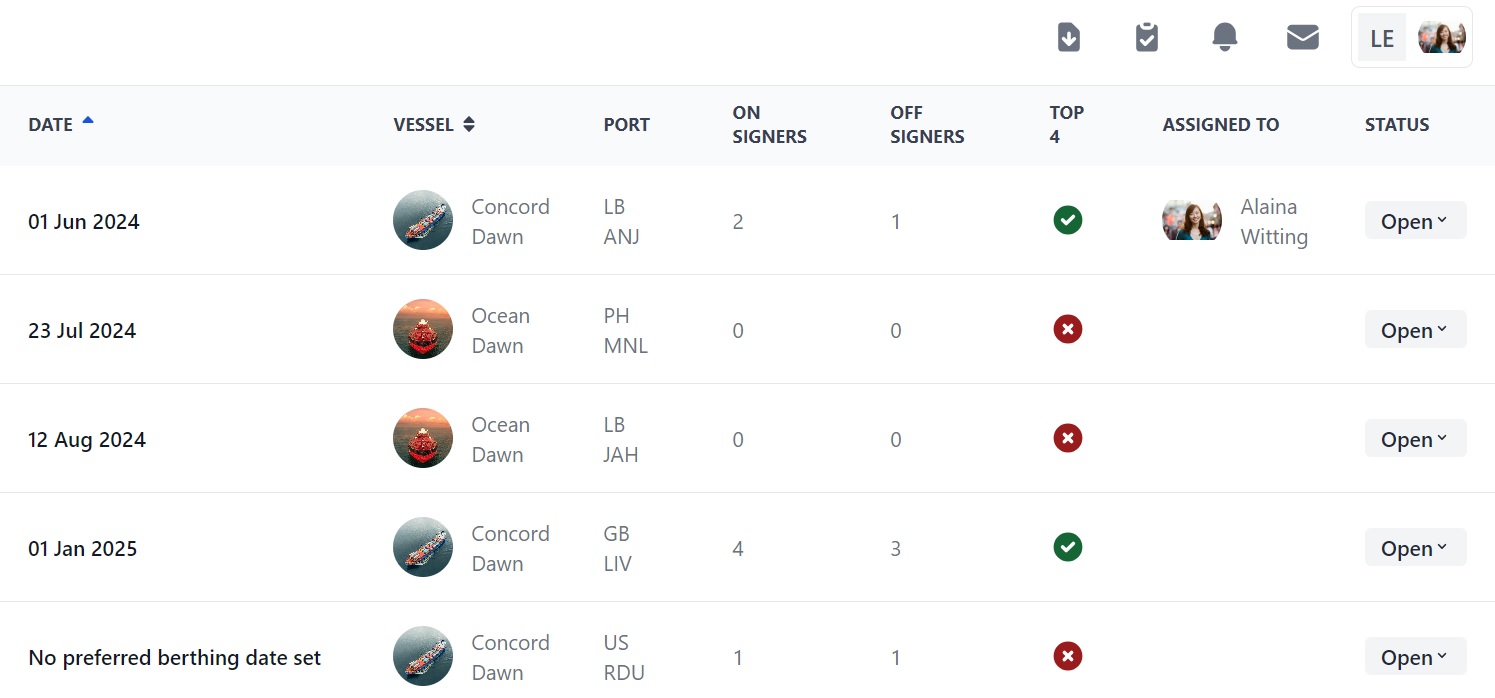
Here you can:
- See the crew change date if one is set, your vessels, the port, the number of on and off-signers, if any of them are top 4, who the change is assigned to and its status.
- Add a new crew change.
- Click the funnel icon at the top to filter your crew changes by Vessel, Dates, Assigned User, Status or Port.
- Change the crew change status from Open to Canceled or Completed.
- Download crew change and/or flight information into an Excel spreadsheet by clicking the 3 dots at the top.
How to add a new crew change
Click the Add Crew Change button. You will see this pop-up box:
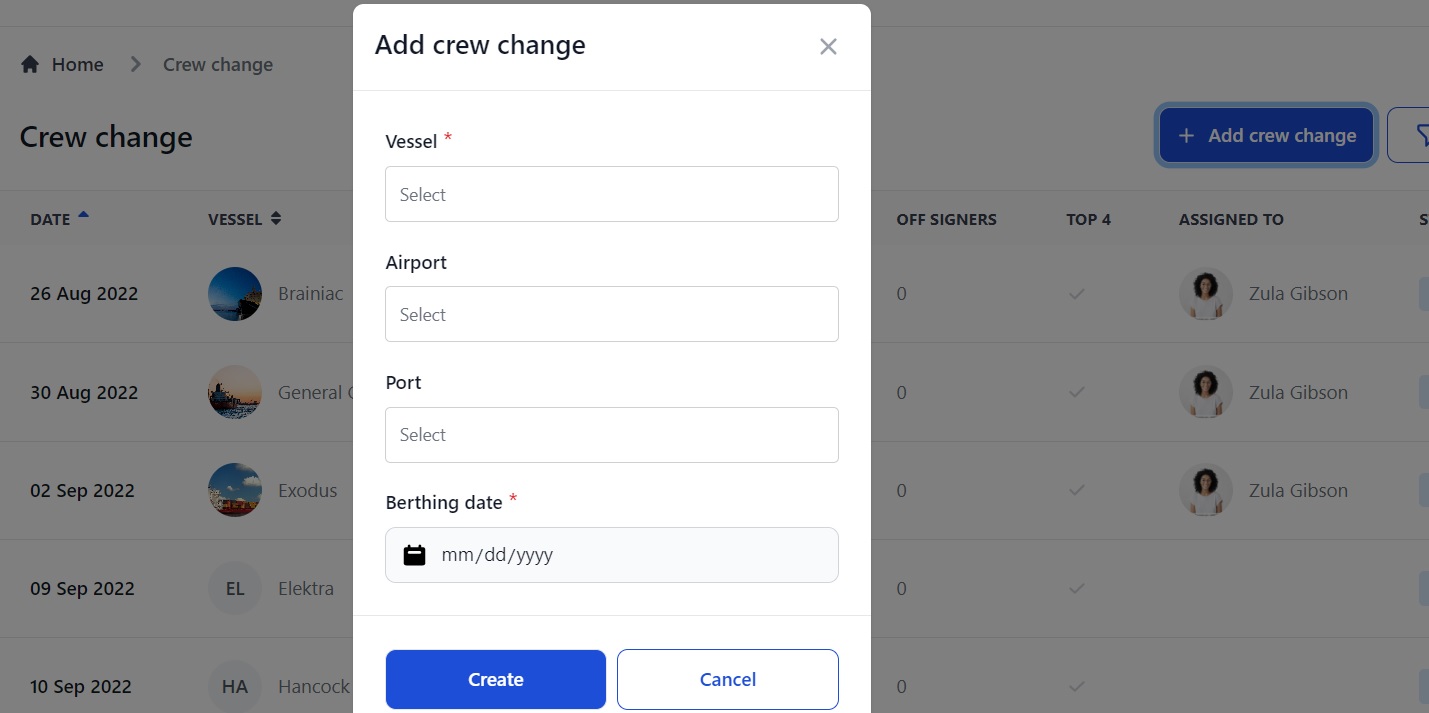
Here you can:
- Select the vessel you want to create a crew change for.
- Select the arrival airport for incoming crew.
- Select the port the vessel will be at.
- Enter the berthing date.
You will go to a new Crew Change page. It looks like this:
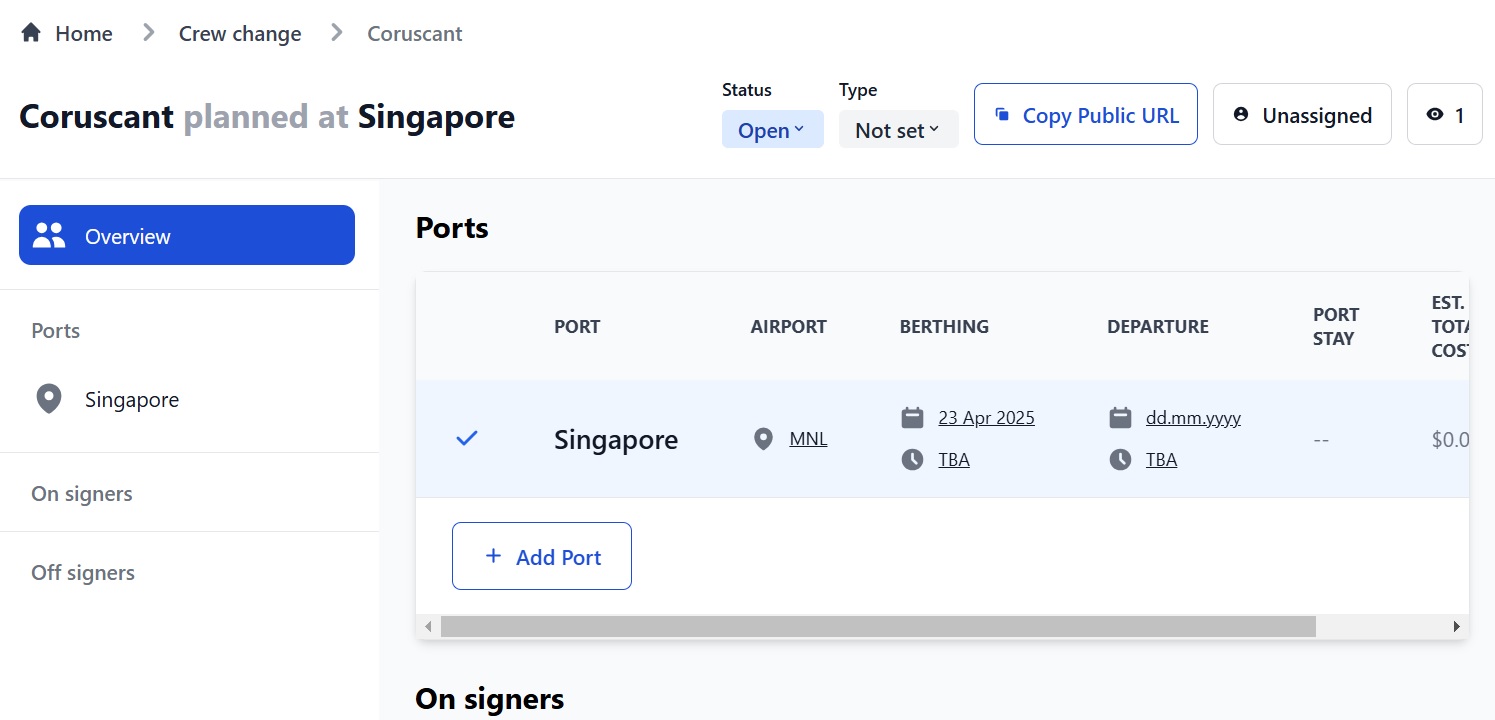
Here you can:
- Change the crew change status from Open to Canceled or Completed.
- Copy the URL to send it to a Port Agent or paste it elsewhere.
- Assign the crew change to yourself or someone else, stop watching it or add other watchers.
- See the crew change information you entered into the pop-up box. You can edit this if needed.
- Enter the estimated berthing time and departure date and time.
- Add another port, airport and berthing date. This is useful if you want to add a 'Plan B' in the event that you need to conduct the crew change at a different port on your vessel’s route.
- Add your on- and off-signers and add notes about them, if needed.
How to add on- and off-signers
Scroll down to the On-Signers and Off-Signers sections below the Ports section:
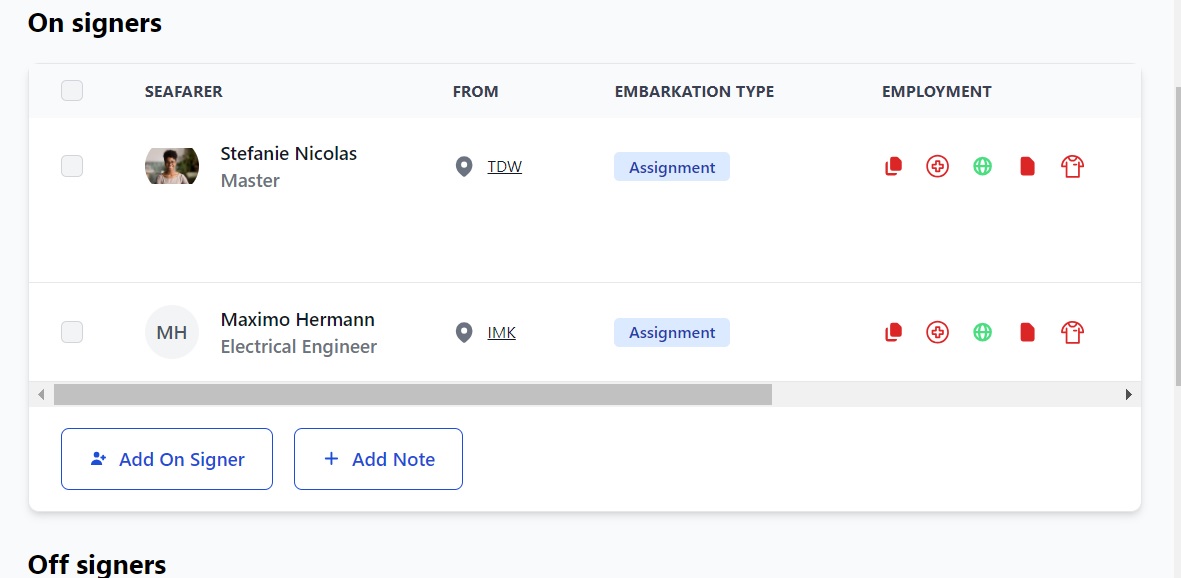
In the On Signers section, click Add On Signer. This opens a page showing all available seafarers:
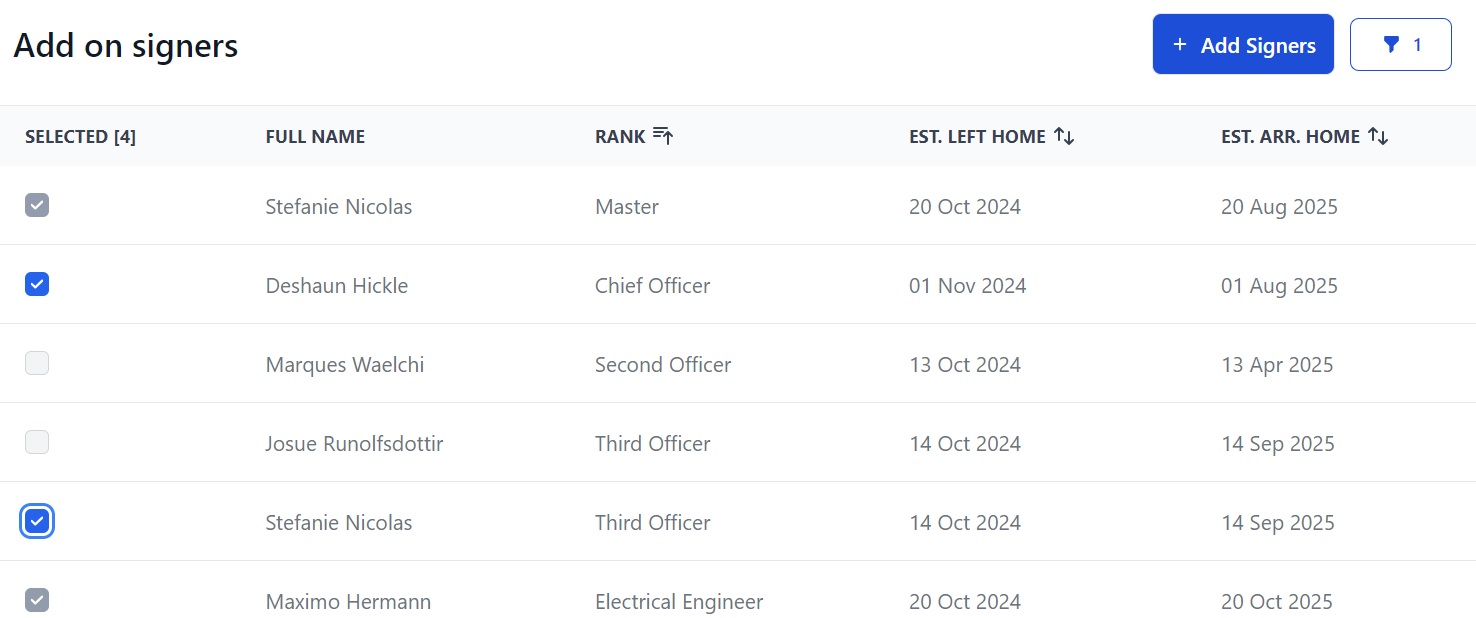
Here you can:
- See available seafarers, their rank, the estimated date they left home and the estimated date they will arrive home.
- Filter seafarers by any of the above criteria by clicking the blue funnel icon at the top.
- Check the box next to the seafarer who is on signing and click the Add Signers button. They will appear on the main screen.
Next go to the Off Signers section and click Add Signers. That opens a page with the seafarers who are onboard the vessel and who can be signed off.
When you have added your on- and off-signers, the Crew Change page looks like this:
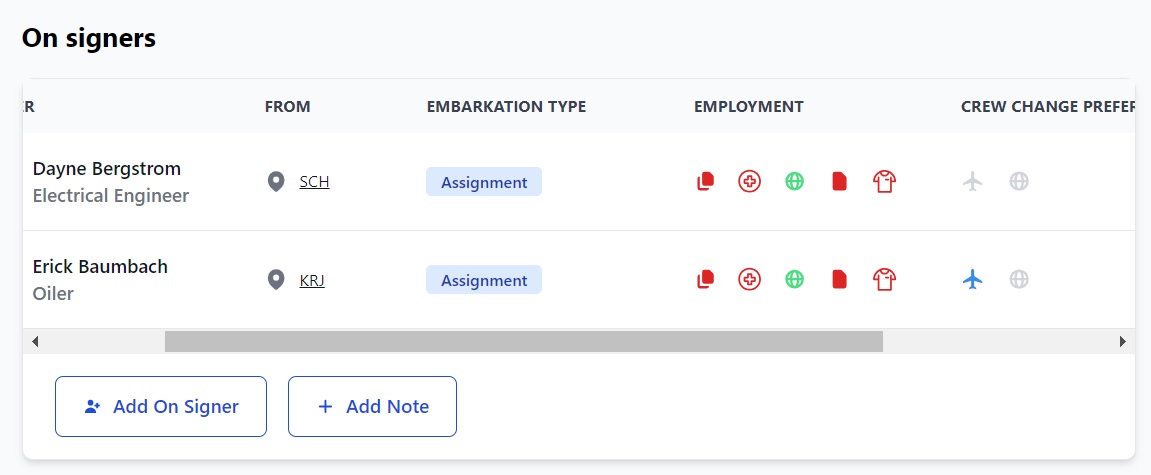
The off-signers section looks the same as the on-signers. Here you can:
- See the seafarer, their rank, the airport they're coming from, embarkation type, if they have their documents, passed a medical check, have a visa, have a contract, have working gear and if they have flights booked. You can also see the preferred port for the crew change.
- The icons are: document validation, medical check, visa, contract, working gear and flights. When the icons are green, it means documents have been validated, medical check is passed, visa has been issued, the contract has been agreed, they have working gear and flights have been booked.
- Other colors mean: gray - not required. Blue - pending. Red- error or missing document.
- If you click on an icon you will go to that stage in that seafarer's recruitment pipeline.
- Click on a seafarer's name to go to their profile.
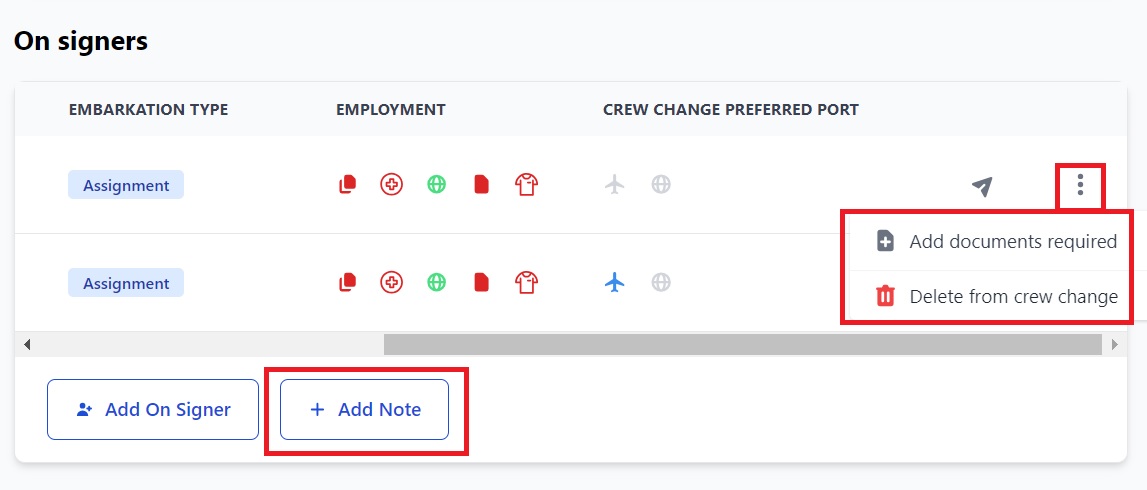
- Click the 3 dots at the end of the row to upload missing documents or to delete that seafarer from the crew change. See the image below.
- Send them an email by clicking the arrow.
- Add a note to an on- or off-signing list by clicking the Add Note button. The note will appear at the bottom of the list. You can edit or delete the note.
How to view a crew change's information
Click on the name of the port in the Overview column on the left or on the main page. You will go to this page:
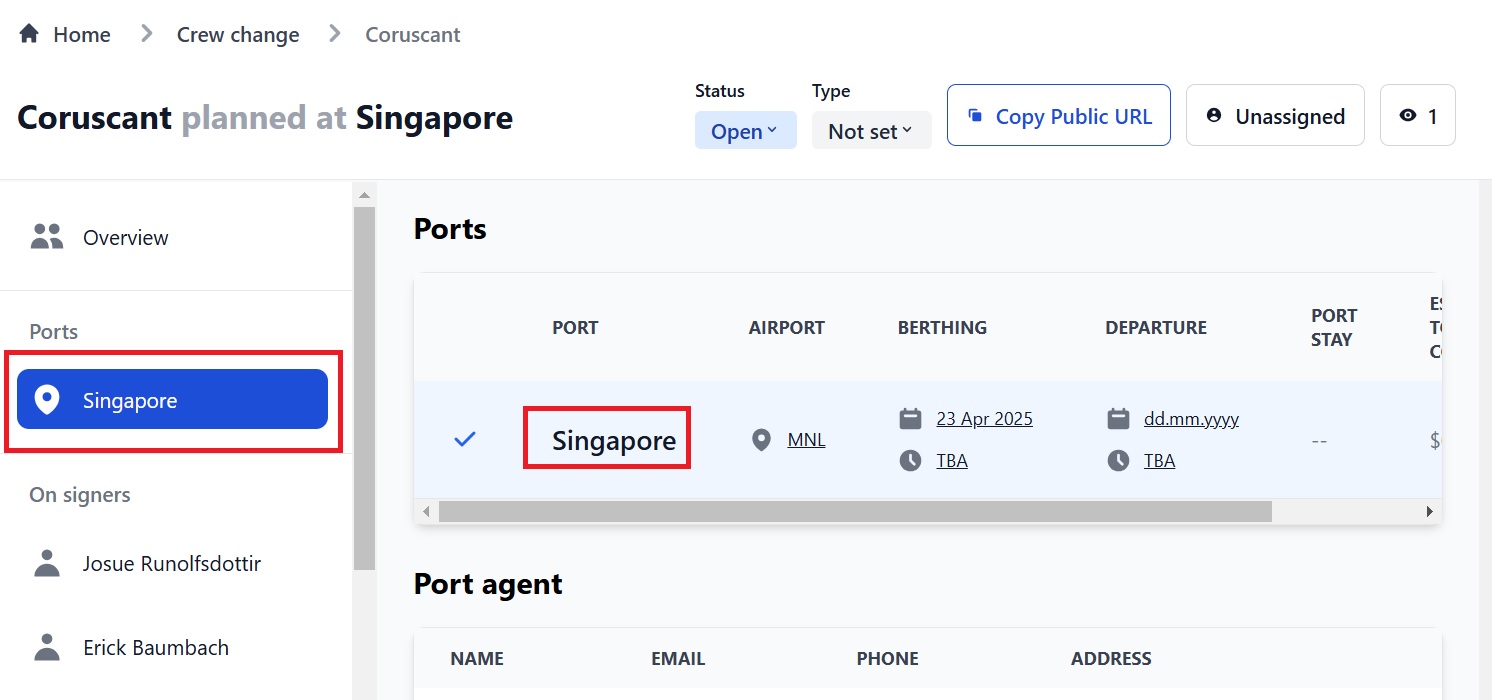
On this page there are 5 sections containing the following information:
- Ports: The name of the port(s) and airport(s), berthing and departure dates, length of port stay and estimated total costs.
- Port Agent: The name, email, phone number and address of the agent. You can enter and edit this information here.
- On-signers: The names, arrival and departure airports, target times and dates, and visas for each on-signing seafarer. Add your seafarer’s trips and travel arrangements here. You can also send them an email. See below for how to add travel.
- Off-signers: This is the same as the on-signers.
- Costs: The expenses for both on- and off-signers including for flights, hotels, agency services, transport, immigration formalities and other. You can enter the expenses here and you can turn on the auto-calculation feature so that the system calculates the costs for you.
Seafarer crew change profiles
When you are in a Crew Change, click a seafarer's name in the Overview column on the left hand side. This will take you to their Crew Change profile.
On this page there are 5 sections containing the following information:
- Personal Information: The seafarer’s name, rank, nationality, date of birth and home airport.
- Documents: Copies of relevant documents such as their passport and seaman’s book. You can download copies of these documents.
- Ports: The ports involved in this crew change plus the date and time and associated costs.
- Travel: The trips and travel arrangements for this crew change, including airports, dates and visas. You can send the seafarer a message, and manually add local travel (taxi, train etc.), flights, and hotel details. Once entered, check the box next to the trip and you can request confirmation from the seafarer. This will be sent to their Crew Change function on the Martide app.
- Working Gear: The type (overalls, hard hat etc.) of gear, the size, and whether or not the seafarer has received it. Read more about Working Gear here.
How to add a seafarer's travel arrangements
To add a new trip for a seafarer (i.e. the overall trip, not the travel arrangements within it.) you must be on the Ports page. Click the port name in the Overview column on the left. You will go here:
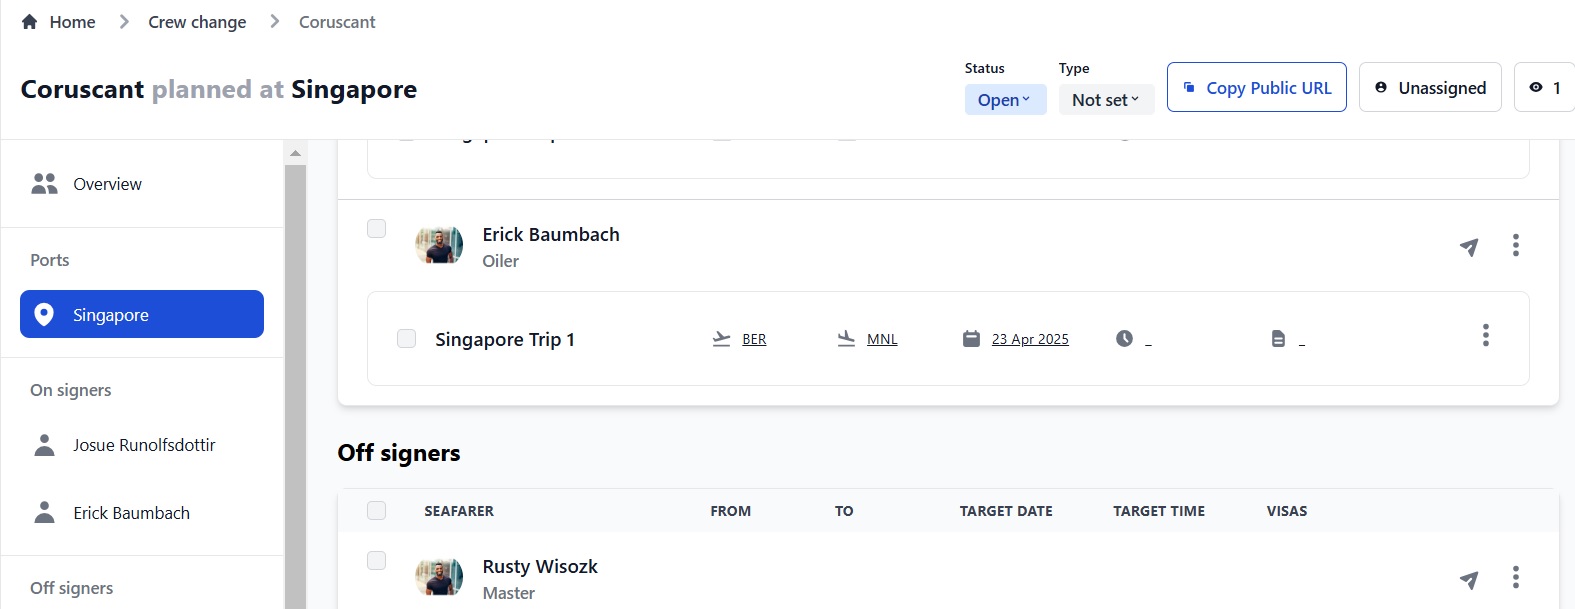
Here you can:
- Check the box next to a seafarer’s name or to a trip. This will display a blue bar at the top of the screen. Click on the buttons on it to get confirmation from the seafarer, request flights from a travel agent, and edit the trip and/or dates.
- Click the arrow to send the seafarer a message.
- Click the 3 vertical dots to the right of their name to add another trip or delete this trip.
- Click the 3 vertical dots to the right of the trip to add local travel (taxi, train etc.), flights, and hotel, or to delete this trip.
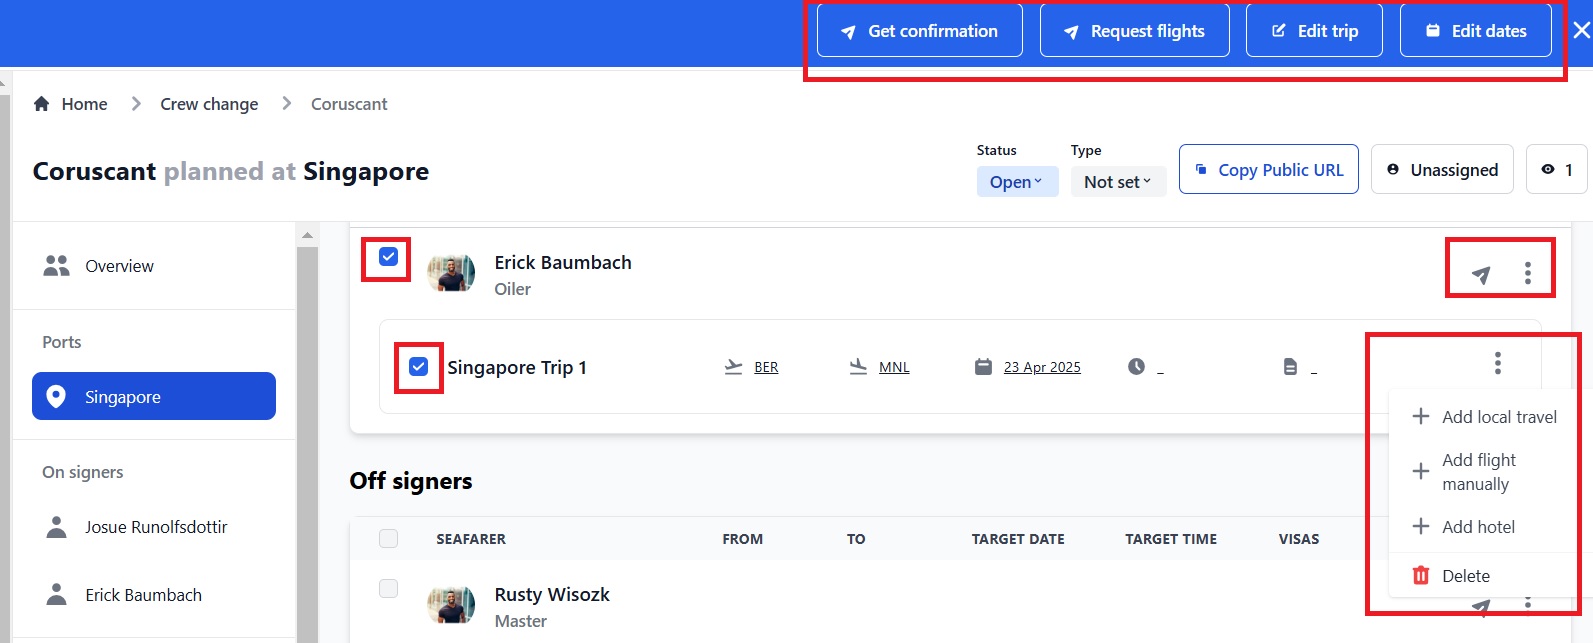
You can add travel arrangements for a trip both on this page or on the seafarer's crew change profile under the Travel section, also by clicking the 3 vertical dots and then choosing Add local travel, Add flights manually and Add hotel.
When you click Add local travel you will see this:
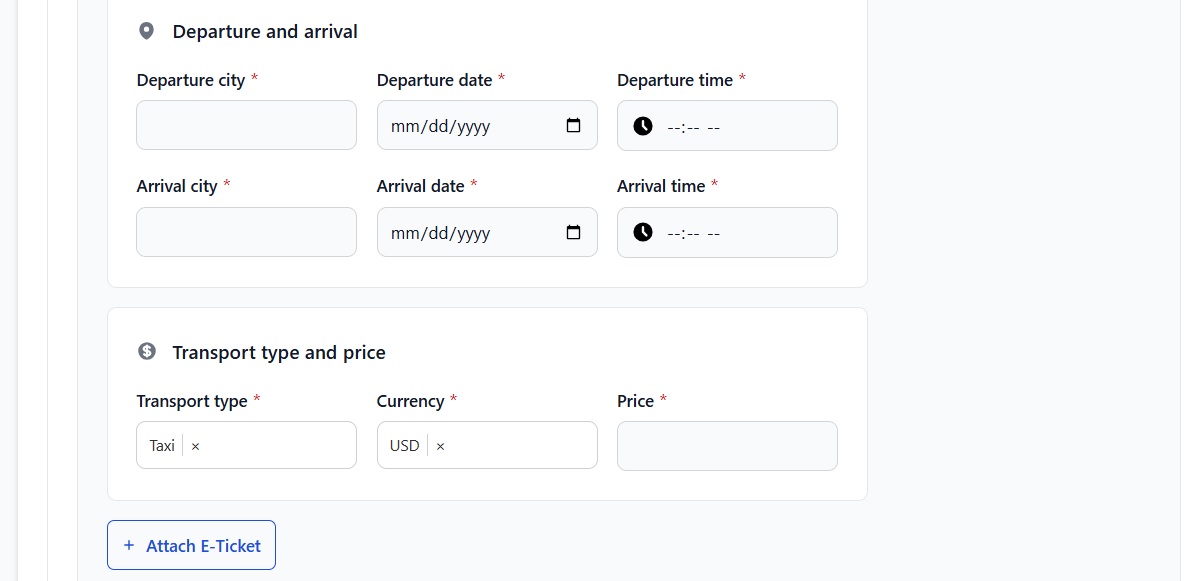
Enter and select the relevant information and attach any eTickets.
When you click Add flight manually, you will see this:
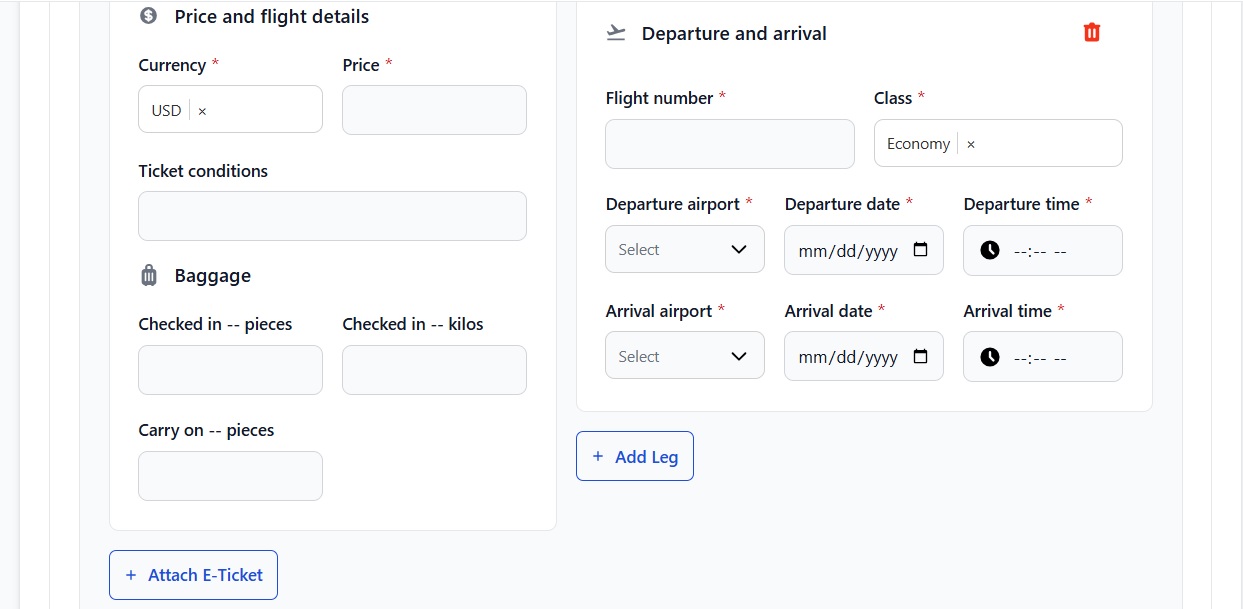
Enter and select the relevant information, add another leg to the journey and attach any eTickets.
When you click Add hotel, you will see this:
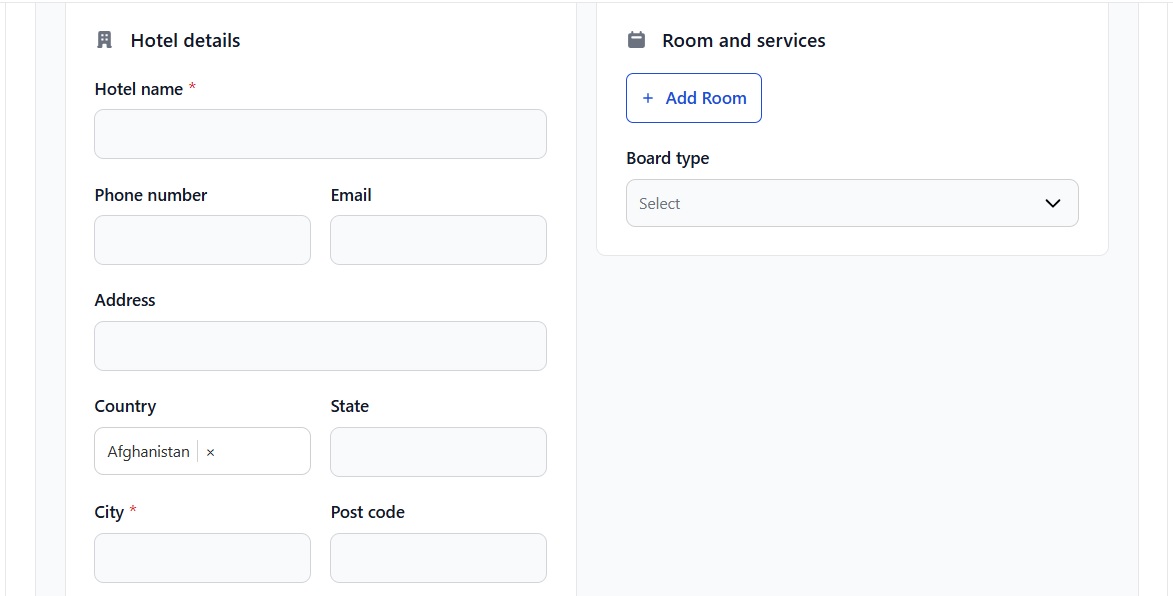
Enter and select the relevant information, including hotel address, check in and out dates, and room type.
Any travel or hotels that you add will then appear under the trip:
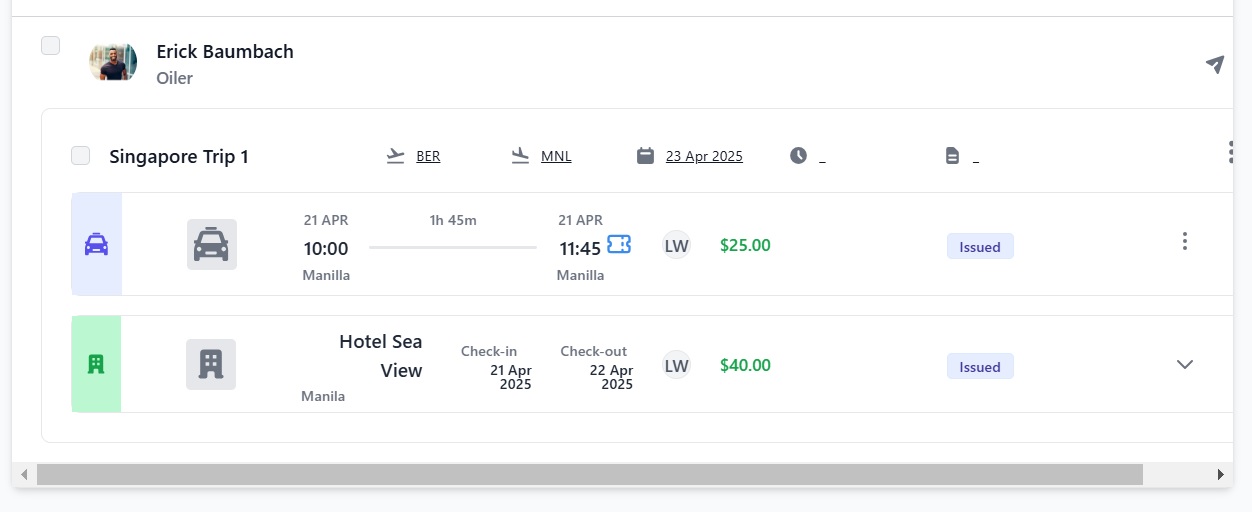
When you've added all the information and attached any tickets, check the box next to the trip or next to the seafarer to request their confirmation and/or to request flights from a travel agent.
Requesting confirmation sends a notification to the seafarer via Martide's app asking them to review and confirm the flights. When you request flights, the request will appear in your travel agent’s Martide account.
You can check the boxes next to as many seafarers as you like and this will request confirmation or flights from all of them, so you don't have to call or email multiple seafarers or request flights separately.
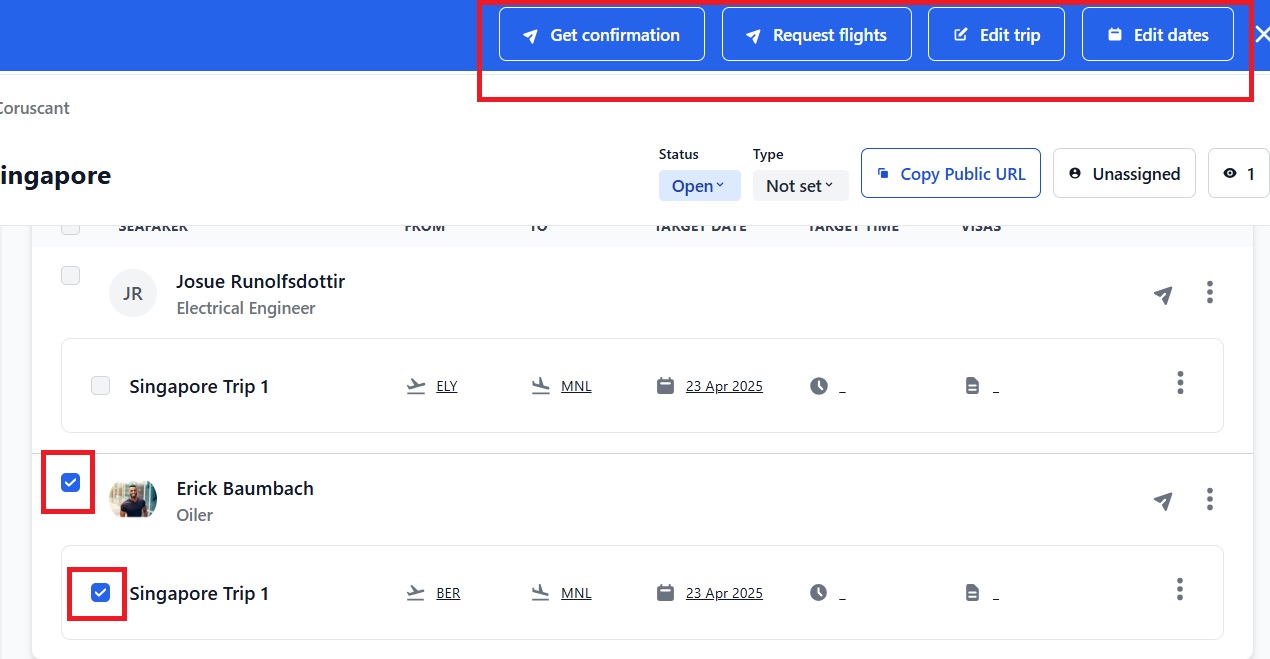
You can read more about selecting your travel agents here.
If you have any questions, please get in touch at support@martide.com