A Guide to Creating Maritime Job Vacancies on Martide

Martide has created our maritime recruitment software solution to help you as a small to medium-sized shipowner, a ship manager or a crew manager streamline your seafarer candidate sourcing, interviewing and hiring processes.
From the moment you post a maritime job vacancy to the minute you hire a seafarer, our user-friendly platform is with you every step of the way.
There are a few different stages to creating job vacancies and tracking your applicants though, so for this blog post we thought we’d walk you through the steps to help get you started.
PS, why not follow us on Facebook, LinkedIn and Twitter / X!?
Tip: this blog post is a version of a step by step user guide that explains how to create a shipping job vacancy on Martide in a little more detail.
How to create your (free!) maritime job adverts on Martide
First of all, you need to know that there are two slightly different types of job vacancy: Recruitment and Assignments. The difference is:
- Recruitment: this is where you add seafarers to the database so that you can potentially hire them in the future.
- Assignments: this is where you hire a specific seafarer for a specific vessel on a specific contract.
In this blog post we're going to be taking you through how to create an Assignment - i.e. a specific vacancy that you need to fill in time for crew change over for a specific seafarer rank on one of your vessels.
Introduction to the Assignment page
First of all, log in to your Martide account and click Assignments in the menu on the left hand side of the page. You will be taken to a page that looks like this:
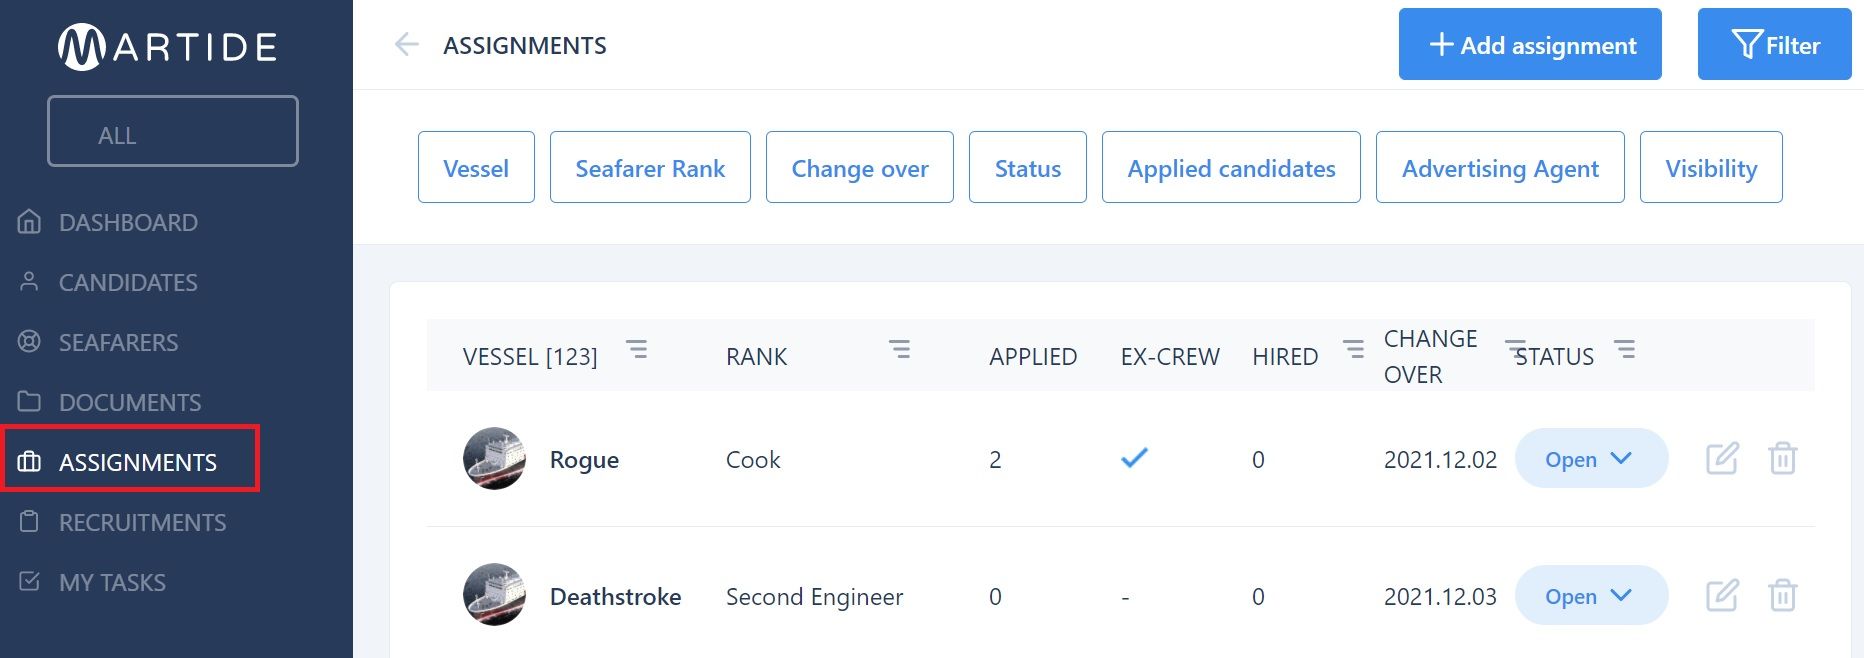
You can do a number of things on this page:
- Create a new Assignment.
- See your vessels, the rank, how many candidates have applied, if any candidates are ex-crew, how many have been hired, the change over date, and status.
- Filter Assignments by Vessel, Seafarer Rank, Change Over, Status, Applied Candidates, Advertising Agent and Visibility (whether it's a private or public vacancy) by clicking the buttons at the top of the page.
- Click on an Assignment to view its details.
- Change the Status of an Assignment to Open or Closed.
- Sort your Assignments alphabetically or numerically by clicking the pyramid icon next to Vessel, Rank, Hired or Status.
- Edit an open Assignment by clicking the pen icon to the far right of an Assignment.
- Delete an Assignment by clicking the trash can icon to the far right of an Assignment.
The purpose of this blog post is to show you how to create a new job vacancy so let's get started.
Creating a new Assignment
To create a new vacancy / Assignment, click the +Add assignment button in the top right corner. The button looks like this:

That will then take you to a page that looks like this:
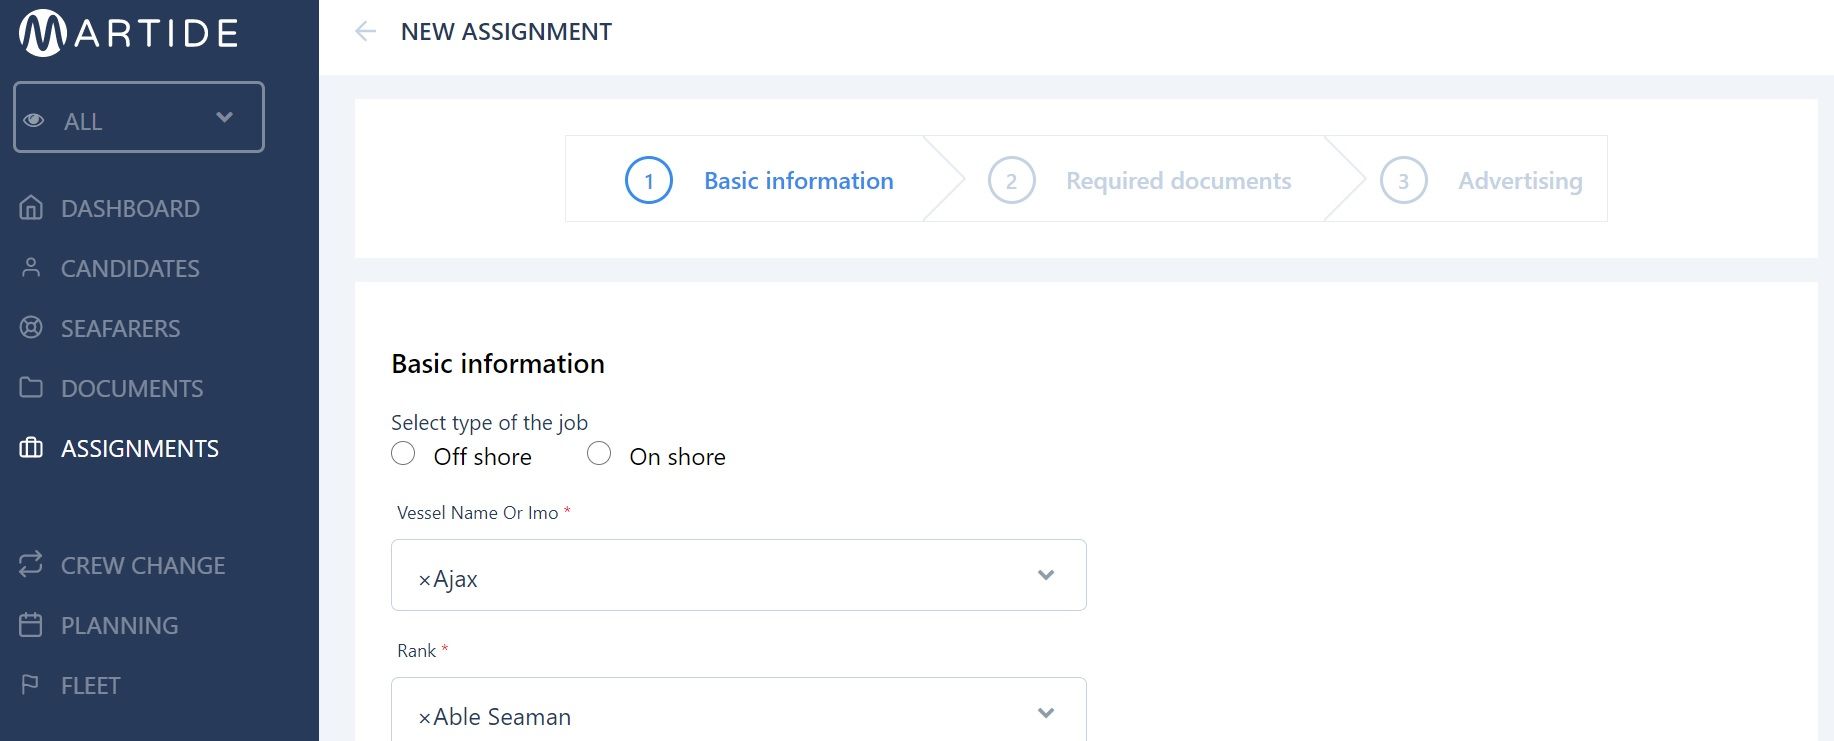
This is our easy-to-use platform for entering all the specifics of your open jobs at sea. This page is quite long as you need to enter all the details about your vacancy, but we'll break it down and take a look at it in sections.
As you can see from the image above, this first section is where you need to enter your vacancy's Basic Information. So this is where you will:
- Select whether the job is offshore or ashore
- Select the vessel name or IMO from the drop down box.
- Select the rank you are hiring for.
When you've done that, scroll down and you will see this:
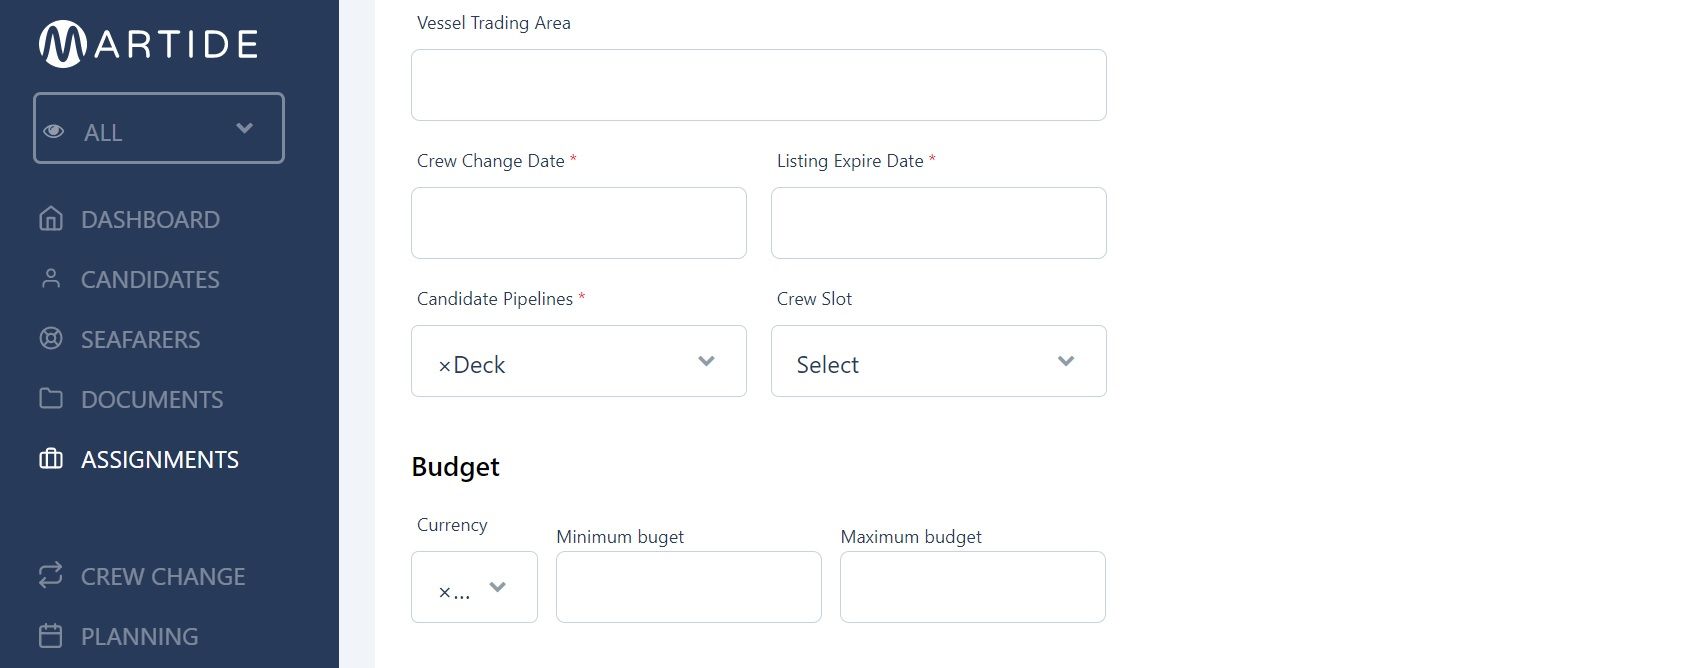
As you can see from the image above, you now need to:
- Enter the vessel trading area.
- Enter the crew change date and the job listing expiry date.
- Select the Candidate Pipeline and crew slot you want to align with the Assignment.
- Select your currency and enter your minimum and maximum budget.
Scroll down the page and you will see information about the visa or visas you need anyone applying for this job to have, as well as the contract length and variance:
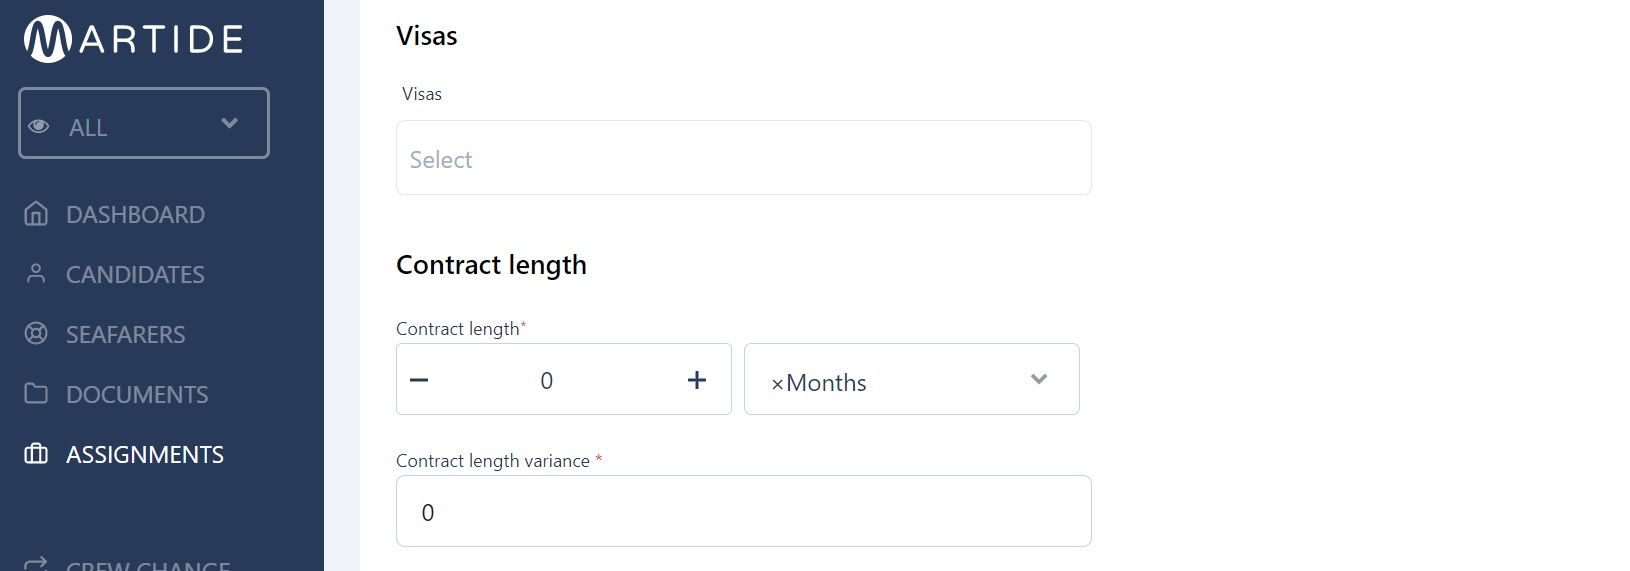
Finally, scroll further down the page and you will see:
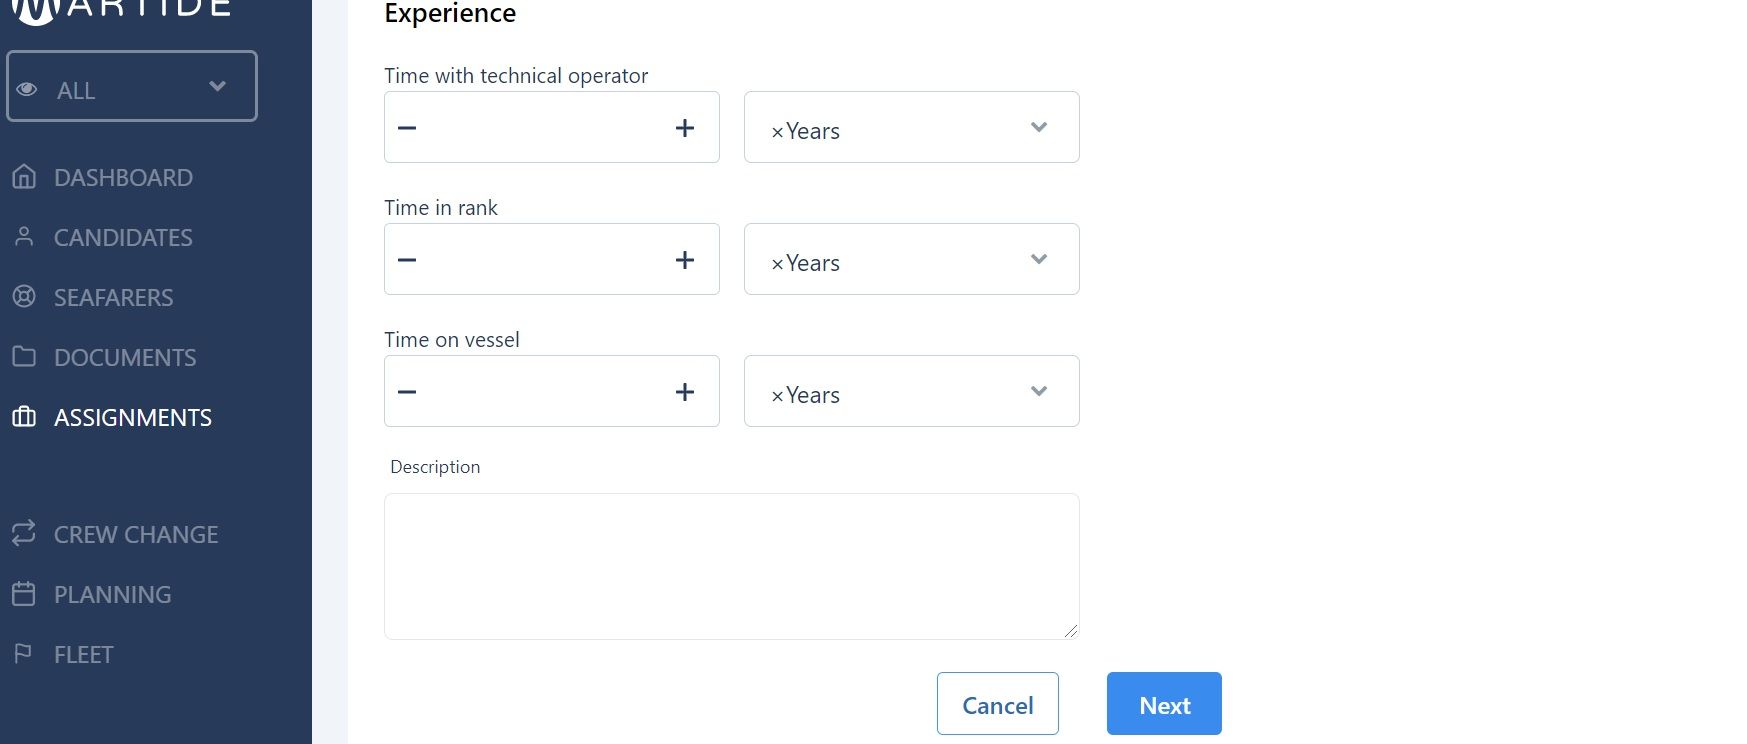
This is where Martide gets really useful. By entering the exact amount of experience you want candidates to have, you can filter out all the unsuitable applicants. This makes life easier and less stressful for you and shortens your maritime recruitment process.
When you’re done, click Next and this will take you to section 2, Required Documents.
How to set the Required Documents for an Assignment
The Required Documents section looks like this:
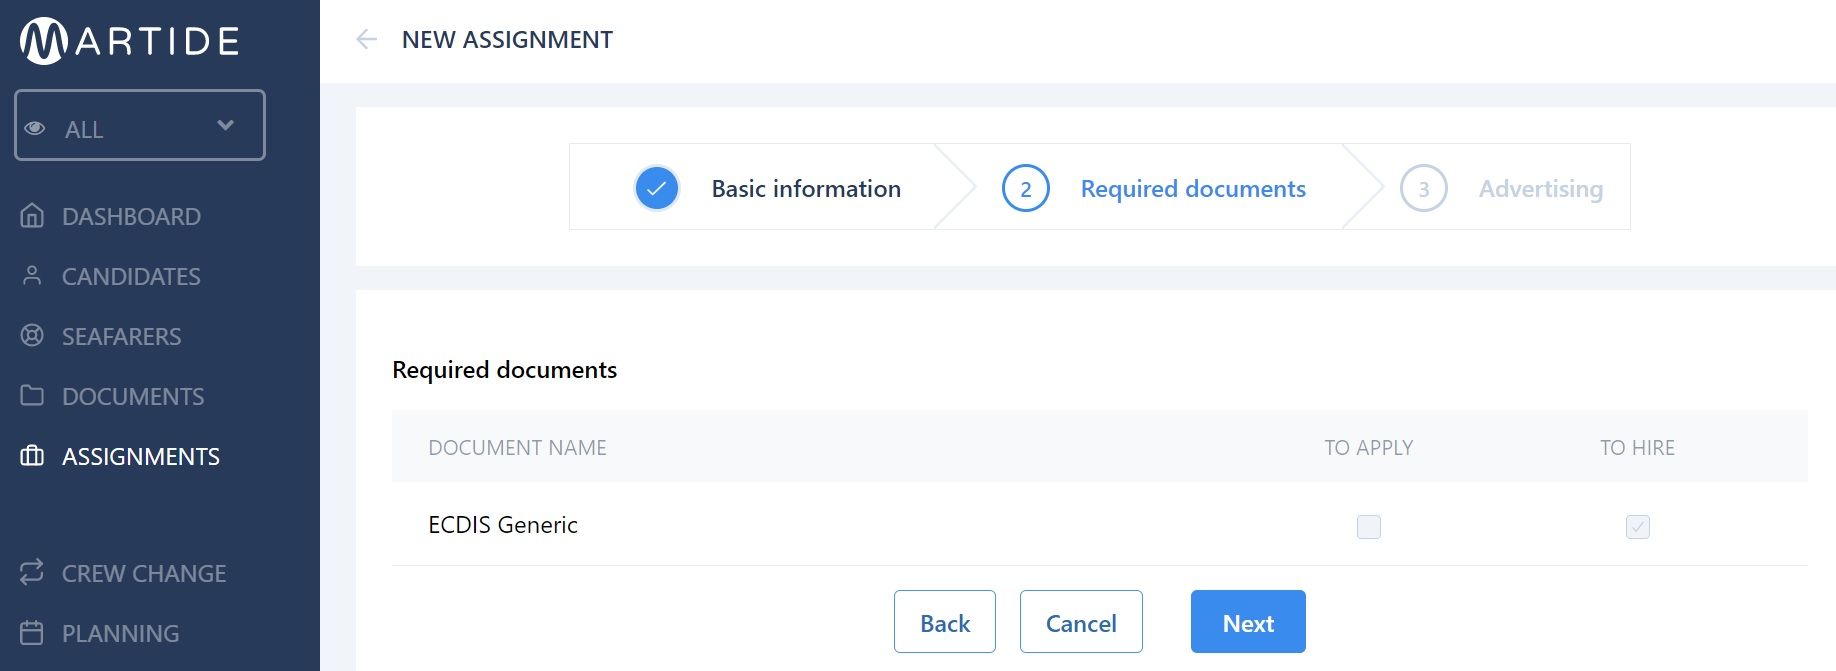
Again, this section aims to make hiring quicker and simpler by only allowing seafarers with the correct documents to apply for your job.
Here you can see which documents have been specified in order for a candidate to a) apply and b) to be hired.
(In our example we're keeping it simple with one document but you will have more.)
Click Next when you're done. This will take you to section 3, Advertising.
Let’s advertise your job vacancy!
Once you’ve finished entering all your Basic Information and required documents you’ll need to advertise your vacancy. The Advertising section looks like this:

As you can see from the image above, you have two options:
- Public: After posting a public position, your basic requirements will be displayed on Martide’s job page on our website and in our mobile app for seafarers where candidates can apply directly. We’ll also look for candidates for your position by checking our database. Plus we’ll share and promote your vacancy on our social media channels too.
- Private: This lets you send your vacancies to manning agents. Unlike public vacancies, agents will be able to see all the information you included in your Data Template.
In our example above the Public option is turned on (showing blue) and the Private option is turned off (this will show gray). To change the settings, slide the button across.
Please note that unless you have used Alternative Documents to override your Data Template, only candidates holding all relevant documents will be able to apply.
If you scroll further down the page and you will see:
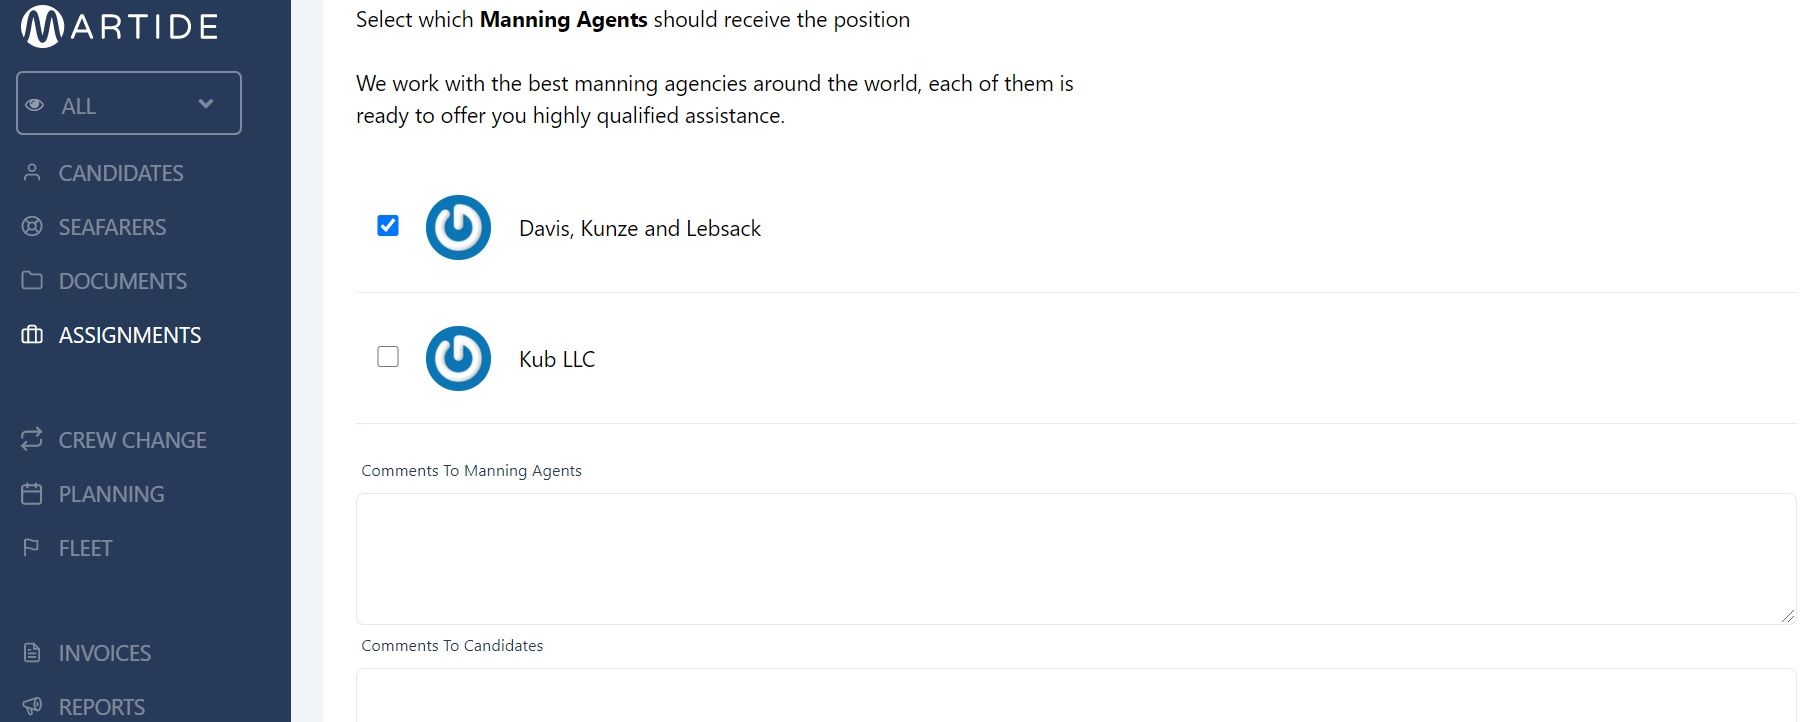
This is where you can choose which manning agent or agents you want to use, and write a comment to them if you wish. You can also leave a comment for any candidates.
Note: If you don’t see one of your manning agents in this section, go to Settings > Manning Agent. There you can choose the manning agents you want to see as an option.
Click the Publish your job button when you're done:

And that’s it - your job is live and you can now start finding, interviewing and tracking suitable candidates.
If you'd like to explore the Assignments page in more depth, our Assignments support guide has more information including:
- How to add a candidate to an Assignment
- How to track a candidate through the Pipeline
- How to edit or delete an Assignment
- How to close an Assignment
- How to sort your Assignments
- How to filter your Assignments
However, if you do need any additional help or if you have any other questions please don’t hesitate to contact us at support@martide.com
This blog post was originally published on August 21st 2019 and was updated on September 21st 2021 to reflect changes in Martide's design.

Eve Church
Eve is Martide's content writer, publishing regular posts on everything from our maritime recruitment and crew planning software to life at sea. Eve has been writing professionally for more than two decades, crafting everything from SEO-focused blog posts and website landing pages to magazine articles and corporate whitepapers.
UK
